
Table of Contents
Introduction
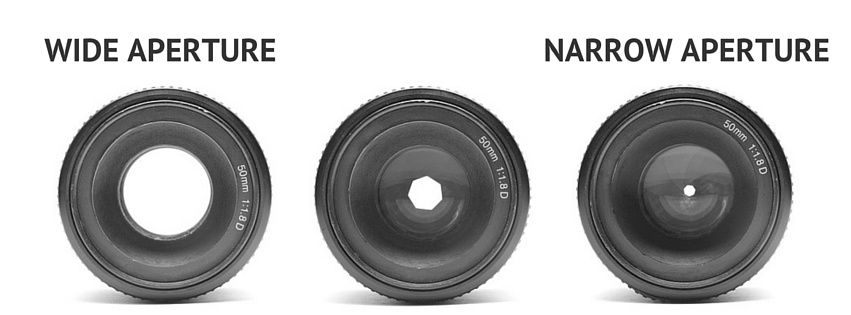
The aperture is the opening in your lens through which light passes, controlled by a diaphragm. This controls how much light reaches your camera’s sensor and can affect the exposure of your photo. The aperture setting also affects depth of field, or what’s sharp in an image versus what isn’t.
Wide-open Aperture
When you want to blur the background, or create a shallow depth of field, use a wide aperture. A wide aperture is synonymous with narrow f-stops and large numbers like f/1.8 or f/2.8 on a camera lens. This means that there is very little separation between your subject and the background when using these settings in comparison with narrower apertures like f/16 or f/22.
Open up your camera’s lens all the way so that it reaches its maximum aperture (lowest possible number), otherwise known as “wide open”.

Narrow Aperture
A narrow aperture is used to create a shallow depth of field, which means the background will appear out of focus. This effect can be used to draw attention to your main subject in a portrait or for photographers who want to shoot street photography and create portraits with an environmental feel. A narrow aperture can also be used when shooting landscapes so that only one part of your image is sharp while everything else blurs around it.
High and Low Aperture, with examples
If you’re not familiar with the terms “high” and “low” aperture, let’s start with an example. Imagine a person on top of a mountain, looking out over the landscape. The higher they are, the less they can see below them—they have a high perspective. A low perspective would be when you’re standing at the bottom looking up at something.
You can apply this same principle to your camera’s lens: as its aperture becomes smaller (known as having a “higher” aperture number), it gathers less light and therefore creates a deeper depth of field effects in your images than if you were using a larger aperture (lower number).
LOW
HIGH
The correct aperture is one that suits your subject matter, the amount of light in the scene, and your depth of field preferences.
- The correct aperture is one that suits your subject matter, the amount of light in the scene, and your depth of field preferences.
- Aperture is a measure of the size of the opening in the lens that allows light to pass through.
- The size of this opening is expressed as an f-number or f-stop.
An aperture is a circular opening through which light passes through your lens and to your camera.
An aperture is a circular opening through which light passes through your lens and to your camera. Its size determines how much light will enter the camera and how much of it will be diffused by the diaphragm blades in front of it. Aperture also controls the depth of field, or how much of an image appears sharp on film (or other recording media).
A larger aperture allows more light into the camera than a smaller one, but this comes at the cost of reducing the depth of field. This means that if you want to achieve greater sharpness across different areas within your frame, you should use a smaller aperture; conversely, if you want less sharpness across different areas within an image—such as when creating bokeh effects with background blur—use a larger aperture.
It works very much like the pupil in your eyes, controlling how much light passes through to the sensor.
The aperture is the opening in the lens that controls how much light passes through to the sensor. It works very much like the pupil in your eyes, controlling how much light passes through to the sensor. The larger apertures (small f-number) let more light into your camera while smaller apertures (large f-numbers) allow less light to pass through.

The aperture is one of the most important aspects of photography as it affects depth of field and also exposure.
The aperture of your camera is one of the most important aspects to consider when taking a photograph. It affects many things, such as depth of field and exposure, as well as shutter speed, ISO sensitivity, and focal length.
Here’s how it works: The aperture is an adjustable opening that controls how much light hits your sensor. The larger this opening is (i.e., the lower number), the more light will enter; the smaller this opening is (higher number), the less light will enter into your camera lens.
When you want to create a shallow depth of field (blur in foreground or background) in order to blur out any unimportant details in front or behind what you want in focus—say for example if there were two people standing next to each other with similar clothing colors but different heights—you would use a low aperture number like f22 or f32 because those settings decrease depth of field so only one person remains sharp while everything else appears blurry from being outside what was considered “in focus” by using such a small hole through which light passes through into our camera’s sensor which detects them onto film ultimately recording what we see onto film via digital photography cameras today (the film was used before).


Conversely, if we wanted everything within a range including both subjects plus perhaps some background scenery around them then we would choose higher numbers like f1/8th or even all way up at f5/6 because those settings increase DOF meaning they allow more things into focus rather than just one specific subject matter alone!
Apertures are usually in fractions, starting with f/1.4 (the largest) and moving towards f/22 (the smallest).
Aperture is one of the most fundamental elements of photography. It’s a circular opening through which light passes through your lens and to your camera. The aperture controls how much light enters the camera, and thus controls exposure by adjusting brightness levels.
Apertures are usually in fractions, starting with f/1.4 (the largest) and moving towards f/22 (the smallest). Different lenses will have different maximum apertures, so be sure you check before you buy!
If you’re unsure how to select the correct aperture, there are several ways you can do this.
If you’re unsure how to select the correct aperture, there are several ways you can do this. One is to use a depth-of-field scale on your lens. The DOF markings will show you what aperture is necessary for various focal lengths and distances. If that isn’t an option for you, then I recommend using a hyperfocal distance chart or calculator. There are also calculators online that will let you know which combination of f-stop and distance will give you the desired amount of depth in focus (DOF) at a specific focal length, so this may be another option if you don’t have access to any other tools listed here. Lastly, if none of the above options work out for you then try using your camera’s built-in DOF markings!
Put into practice, this is when you want to reset the aperture based on changing conditions and you need to change the shutter speed to achieve the same exposure.
Now it’s time to put this information into practice. This is when you want to reset the aperture based on changing conditions and you need to change the shutter speed to achieve the same exposure.
Let’s say that your camera has an f/1.4 lens and you want more depth of field in your photo. A good starting point would be trying an aperture of f/2.8 or smaller (a higher number). If your photo is still too dark, increase your ISO until it registers as properly exposed on the LCD screen of your camera (this could take some trial and error).
When to use Aperture Priority
Aperture Priority is a semi-automatic mode that allows the photographer to select the aperture and the camera will select the shutter speed.
This mode is useful when you want to control the depth of field in your image. It’s also great for shooting portraits, as it gives you more control over how blurry or sharp an object looks in focus against its background.
When to use the Low Aperture
Use a low aperture when you want to blur out the background or when you want to create a nice bokeh. This allows more light to be captured so you will be able to use faster shutter speeds. This is ideal for portraits, headshots, or nighttime photography to include stars.
When to use High Aperture Number
High aperture numbers can be used to create a greater depth of field, which is perfect for landscape. The larger the number, the less blurry the background will be. When you see landscape photography you will notice that everything in the photo is usually in focus. The reason for that is they are using a high aperture and if using it in low light it will cause your shutter speed to be slower therefore it will require a tripod to keep the composition in focus.
As you can see, the aperture setting is not a one-size-fits-all solution. You must use a high aperture number when shooting landscapes, distant subjects, or anything you want in focus. This results in everything from close focus objects all the way to infinity being in focus.
High aperture numbers are used for portraits because they create a shallow depth of field effect that focuses the viewer’s attention on your subject and makes them stand out against their background.
Conclusion
And that’s it! The most important thing to remember is that when you’re shooting with your camera, it’s always a good idea to keep an eye on the shutter speed and aperture. This will ensure that your pictures turn out well-exposed and sharp.
Be the first to comment